Hi Everyone!
I haven’t crafted this weekend – but I’ve done a lot of organizing. The rest of my Copics arrived on Friday, as well as an Amazon order for some sheet protectors – which I have been waiting for to revamp my storage of my scraps. So I wanted to share with you how I did this. I got this idea from Carissa Wiley. You can see it in her video here. She stores her paper in magazine holders like I used to store mine. My magazine holders here are handmade using USPS boxes, cut down and covered with postal wrapping paper (is that what you call it?) Here’s a picture of how I used to store my paper:
 I now store my paper horizontally in two tall units that my husband built for me. I was perfectly happy with how it was stored before, but my husband had an itch to build – so I let him – and I’m happy with how it turned out :). As far as scraps go, I’ve always stored them in a plastic file box, separated by file folders. But I saw Carissa Wiley’s paper organization video and I thought it was genius to use sheet protectors to store scraps – why hadn’t I thought of that?!? I kept trying to think of how I could store my scraps with my full sheets and this is it!
Here is how it looked before yesterday. It was ugly – and took up extra space in my craftroom that I didn’t care for:
 I purchased some heavy weight sheet protectors (see them here) and cut the 3 ring portion off them as seen here:
 Then I used my Dymo Label Maker to make labels for each cardstock color for each sheet protector:
 And now, each compartment holding full sheets has a sheet protector holding scraps of the same color. This is also nice because it’s now labeled – I used to have a sticky note at the bottom of each cardstock pile with the names of the colors, but I couldn’t see it.

 Now my file box holds receipts – orders from SU and other stores and is hidden away in the closet :).
Who is ready for Copics??? I wrote about the storage unit my husband built here and about my decision to get ALL the Copics and where I got them here. It’s a HUGE decision and I wish everyone the best of luck with their decision to starting a Copic collection – it took me months of thought, contemplation and waiting, but it’s finally all here and I’m so excited to share what it looks like. I explained previously that I purchased Sandy Allnock’s Hex Chart “designed to show the visual color relationship between Copic marker colors.” You get two PDF files – one hex chart that is blank – for you to color using your own Copics – and one colored by Sandy to see all the colors compared to what you have so you can decide if you need to buy additional colors to compliment what you already have. This chart is so helpful visually – as the Copic numbering system and the colors on the Copic Sketch plastic caps are not always true to their ink color. Here is a picture of my colored Hex Chart, which I have colored and laminated (I had to run them through the laminator several times to get a seal all the way around- there are two sheets – a second sheet for grays).
 When I went to fill up my storage unit, I had a hard time deciding how I wanted to put my markers in – try to mimic this hex chart or to store by color families as organized on Copic’s colorwheel:
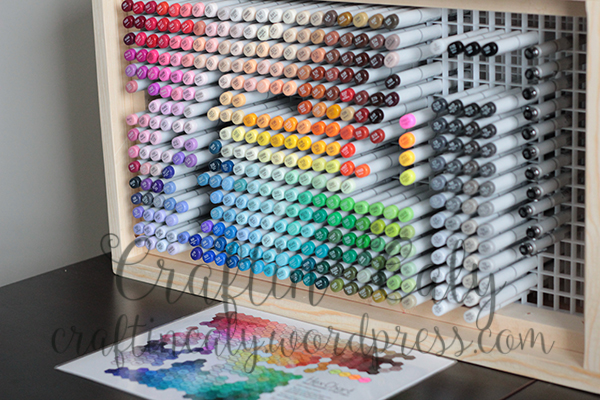
 I didn’t have enough rows on my storage unit to follow the Hex Chart to a tee – but I did a little cramming and re-arranging and in the end, I think it turned out pretty well:
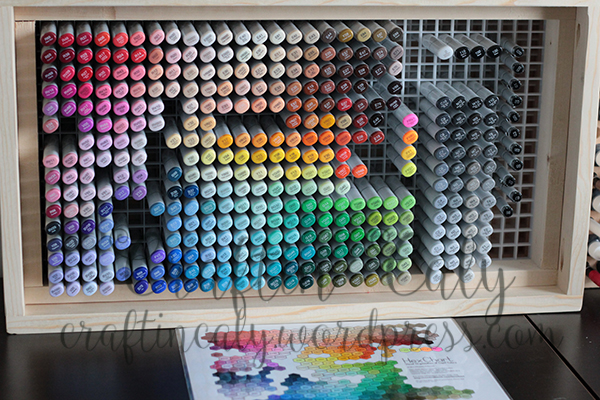 There’s plenty of space left if new colors become available. I have my Multiliner SP Pens stored to the right.
***Deep breath*** I’m so glad this process is over. I’ve spent too much time thinking about it, planning it, and way too much money on it! I don’t know how other crafters begin with a few pens here and there – I would have too much anxiety thinking about it all the time. But I know they’re pricey so I get that this is how some people have to begin. Fortunately, working overtime for 7 months gave me some playing money. At least – that is how I’ve justified this purchase.
I need to do more coloring very soon. Stay tuned!
 UPDATE:
I’ve received a lot good feedback and along with that, a lot of questions about this unit so I wanted to post a little update to talk a bit about the dimensions and how to make it. As I mentioned, my unit doesn’t have enough rows to mimic the Hex Chart. If I were to do it ALL over again, I would’ve counted the number of rows and columns on the Hex Chart first. But I think the building process would’ve remained the same.


Hi Caly! I’d like to link over to your post, this is a great idea to store them in this order! 🙂
LikeLike
Certainly! I would be honored!
LikeLike
Oh, Cali, how exciting to see your organization going so well! I love the paper shelves your DH made you…how sweet of him! And what a great way to store your Copics using Sandy’s order! Fabulous and exciting that she is going to link to her blog!! That’s big!! Hugs!
LikeLike
Yes, it’s BIG – I have been so excited about Copics and I’m truly honored that she wants to link it. And my husband is very sweet. He has built all the storage units in my craftroom! *hugs* Thanks for stopping by – you know your stopping by is an honor too!
LikeLiked by 1 person
There is not particular word to describe your work rather than you start with scribble and you end up with art piece and that’s WOOW
LikeLike
I am sorry i missed it up its for sandy 🙂
LikeLike
It’s ok! I agree that this should be for Sandy! 😉
LikeLike
I saw your Copic storage idea on Sandy’s blog and had to come find out more about your great idea. I am definitely going to try and rearrange my Copics like this. Thanks for the inspiration
LikeLike
Glad this was helpful for you, Martha! Thanks for stopping by!
LikeLike
Oh my Caly – in love with your storage! Did your hubby also make your Copic storage too?
LikeLike
Hi Rita! Thank you! Yes, my husband (I tried to help…hehe) made that Copic storage from egg crates from home depot (they’re for paneled lighting).
LikeLike
So clever. Your husband should set up a business selling these – they would go like hotcakes 🙂
LikeLike
Ok Caly, I need you to talk to your hubby for me because this is brilliant! I have been searching for a Copic storage for quite some time now and since Studio Calico went out of business, it is hard to find storage that will fit all of the Copics. Sooooo, is he sweet enough to make one for your followers 😀 Or tell me how the heck he made it so that I can give it a go lol! Tell him that we all love his work and he should start selling it. 🙂 I love your organization and that paper rack looks so beautiful with all of the colors all organized. You did a lot of work and put in a lot of thought for this system. Congratulations on the completion of it all. 🙂 I bet it makes it a lot easier to work too! Thanks for sharing with us! I know it gives me some serious inspiration and now I want to go organize my craft room some more 😉
LikeLike
Hi Beau! Thank you!!! I provided some instructions in a previous comment. Let me know if it makes sense. If not, email me and we can chat more specifically. craftincaly@gmail.com 🙂
LikeLike
Updated box directions above. I hope it’s easy to follow!
LikeLike
Oh My Goodness – give your husband a huge hug for designing your Copic storage!!! I agree with the others that he really should sell them (put me on the list) or at list give us some instructions so we can make our own. It is absolutely fabulous!!!
LikeLike
I’ll have to write something more formal up! But I did provide instructions in a previous comment. Let me know if you need more! Thanks for stopping by!
LikeLike
Updated box directions above. I hope it’s easy to follow!
LikeLike
Hi! Hy husband is making this copic box for me, but we are wondering how you solved the problem with the caps coming off the inside eggcrate? Thanks
LikeLiked by 1 person
It has never come off for me. Just make sure you aren’t too rough when you pull the markers out. 😘
LikeLike