
Hi Everyone!
I’m so excited you’re here to hop along with LiveLoveCard’s Holiday Photo Card Blog Hop. This is the first one that I’ve ever been a part of and I am so honored! I’ve made holiday cards for the past three years and have always included a personal family photo with each and I’m excited to share my card this year as a part of this blog hop. There are 11 total hop stops so please hop along when you’re done here and view the other cards to get ideas for your own cards this year! It’s not too late! And of course…leave a comment to be entered for a chance to win some amazing prizes! Darlene (the owner of the LiveLoveCards community has 9 prizes to share) -details are below!

My card is a case of one of Concord & 9th’s cards using their Take a Bough dies. I got this set last year and didn’t get a chance to use them and I really love the card I saw. I’ve added my own touches with an embossed snowfall background and tag with hollies and berries. Each piece is heat embossed for a raised look. It’s simple and straight forward but really screams holiday. When making cards in mass production, it’s quickest to do each step individually and then assemble at the very end when each component is complete.

First, I cut out all my boughs/pines. This part, I have to admit…is painstaking long. I used 3 different shades of green cardstock, more than 2 full sheets each (8 1/2 x11). I cut them down to 4 1/4 x 5 1/2 pieces to make it easier to run through my big shot…but can you imagine?! 8 pines for each card – that’s 4 boughs – for 64 cards! *GASP* I found myself very frustrated but here’s a tip I decided to try towards the END of this long process. The paper doesn’t release from the dies well after a few cuts. I was using my paper piercing tool to push them out and ending up tearing a lot so I took a dryer sheet, folded it three times and ran my dies through my die cut machine. This gives it a nice waxy coat and they release from the die SOOOO much easier. Ugh…I wish I had done it sooner!

Once they were all cut, I cut them in half and started grouping 4 random pieces together and used my handheld stapler to hold them together. This was the quickest for me. If you have a better way of holding 4 pieces of this together – by all means – do it! And tell me about it because I’d like to know!
Next, I prepared my tags (I couldn’t decide between white and red so I did both) by cutting pieces that were 2″ by 2 1/2″ (this is a little snug…if I could do it again, I would do 2 1/2″ by 2 1/2″). I stamped them all in batches using Versamark ink and embossed the white pieces with red powder and the red pieces with white powder. Then – you die cut them all…Yes…I did it 64 times. *sigh* BUT THIS IS WORTH IT!

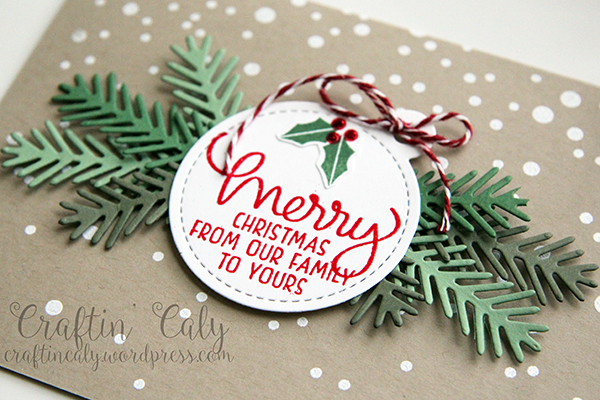
I tied some red and white twine to the tags and then stamped a bunch of hollies and berries (holly and berries?) on white cardstock and ran this through my Brother Scan N’ Cut 2 so it can cut each piece out for me. Seriously ya’ll…this is the BEST birthday present ever – put it on your Christmas wish list! Mine was purchased on Amazon but it’s available in stores at Michael’s now! NO MORE FUSSY CUTTING! It scans anything flat and cuts it out – perfect for stampers. Just so you know – I’m not getting paid to brag about this amazing product! I wish I were ;). So I adhered these hollies and berries to the tags and to add a bit more umph…I used some red stickles on the berries. I’m impatient – but I laid them all aside to dry as I stamped and embossed the cards with snowfall.

Once the card bases themselves were stamped and embossed, it was time for the assembly. Put the boughs on, leaving room in the center for your tag. I adhered the boughs on using glue dots and adhered the tags on using Stampin’ Dimensionals.

I didn’t do anything too clever with my photo this year – last year I sewed it to my card. If you’d like to see it, click HERE. I got some clear photo corners and adhered them to the inside top portion of my card. I’m not fancy – I make my own collage using PhotoScape and then I print them via Walmart online – it’s the cheapest option and they have a photo size of 4″ x 5.33″ – fits perfectly in an A2 card with a nice matt around the photo.

I got a custom stamp made this year for our names – saves me from writing the same thing so many times! I have used this Etsy shop many times for my “handmade by” stamps and address stamps and I love it! It does take a few weeks to get as it is made and shipped from Malaysia – but it’s affordable if you have time to wait. The link is listed below with all of my supplies. I plan to hand address these in calligraphy and hope these get mailed to be received by Thanksgiving. HAPPY HOLIDAYS, everyone!
That wraps up this year’s photo holiday card for me. Thank you sooooooo much for being a part of this blog hop and for stopping by!
HERE is the video of the process if you’re interested in seeing it. Please give me a thumbs up!
GIVEAWAY!

- Two yearly subscriptions to LiveLoveCards.com
- $25 gift certificate to Simon Says Stamp
- $25 gift certificate to Ellen Hutson
- $30 gift certificate to Altenew
- MISTI (or mini MISTI!) from My Sweet Petunia
- $25 gift certificate to Paper Smooches
- $25 gift certificate to Lawn Fawn
- $25 gift certificate to My Favorite Things
Winners will be selected at random from the comments left on each blog hop stop. Be sure to leave a comment on each stop to increase your chances to win! Leave your comments by Tuesday, November 22, 2016, 11:59pm CT. Nine winners will be announced on LiveLoveCards on Wednesday, November 23rd, just in time for Black Friday. 🙂
BLOG STOPS:
Be sure to head to these blogs and see the other creations and leave a comment at each stop for your chance to win one of the NINE prizes that Darlene has!
- LiveLoveCards
- Simon Says Stamp
- Caly Person <—–YOU ARE HERE! (AHHH!!! I still can’t believe I’m on this list!)
- My Sweet Petunia
- Ellen Hutson
- Kelly Griglione
- Altenew
- Cassie Tezak
- Paper Smooches
- Francine Vuillème
- Catherine Bowen
SUPPLIES:
*Disclaimer: I am not being paid by any company to promote their products. I make cards using stamp sets and materials which I love and I love to share. To view where these items can be purchased, click on the linked abbreviations below (SU for Stampin’ Up!, SSS for Simon Says Stamp, EH for Ellen Hutson, AMZN for Amazon, LF for Lawn Fawn, MFT for My Favorite Things, etc.).
Not Pictured: Red Twine, Dryer Sheet
 ME Jingle Greetings EH | SSS |ME |
 SSS Falling Snow |
 C&9 Take a Bough EH | SSS | C&9 |
 LF Stiched Circle Tags EH | SSS | LF |
 White/Gray Big Shot |
 Big Shot Magnetic Platform EH | SSS | AMZN |
 Standard Cutting Pads EH | SSS | AMZN |
 MB Metal Adaptor Plate EH | SSS |
 EK Success Powder Tool EH | SSS | AMZN |
 Versamark Ink EH | SSS | AMZN |
 SU Heat Tool |

HA White Embossing Powder |
 WOW Primary Apple Red Superfine |
 Memento Tuxedo Black Ink EH | SSS | AMZN |
 Crumb Cake Cardstock |
 Real Red Cardstock |
 Neenah Solar White 80 lb EH | SSS |
 Always Artichoke Cardstock |
 Garden Green Cardstock |
 Wild Wasabi Cardstock |
 SU Stampin’ Dimensionals |
 ZOTs Adhesive Dots EH | SSS | AMZN |
 Martha Stewart Mini Scoring Board EH | SSS |
 Mini MISTI – Laser Etched Mini MISTI – Laser Etched |
 MISTI – Laser Etched MISTI – Laser Etched |
 SU Handheld Stapler |
 SU Paper Piercing Tool |
 Teflon Bone Folder EH | SSS |
 Absorber |
 Hang Your Stocking |
 Tombow Liquid Multi Mono Glue EH | SSS | AMZN |
< Brother Scan N Cut 2 |
 SU Clear Block Bundle |
 Garden Green Ink |
 Real Red Ink |
 Ranger Stickles – Christmas Red Glitter Glue EH | SSS |
 Pioneer Photo Corners – 250 ct |
 Custom Stamps Etsy | FB | EBAY |


Beautiful cards! I know how time consuming all that die-cutting must have been, but the end result is so worth it! Thanks for sharing.
LikeLike